
Help Desk - Task Details
Task details are visible by clicking on a task in the list or by typing the issue or task's reference number in the Action Toolbar. From the help desk's task details side panel or in full screen task details view users can change the priority, status, and staff assignment; reply to the help desk task and access all file attachments as well as edit previous replies. Options that are available and visible to a user in tiHelpdesk will depend on the subscription level and the user's privileges.
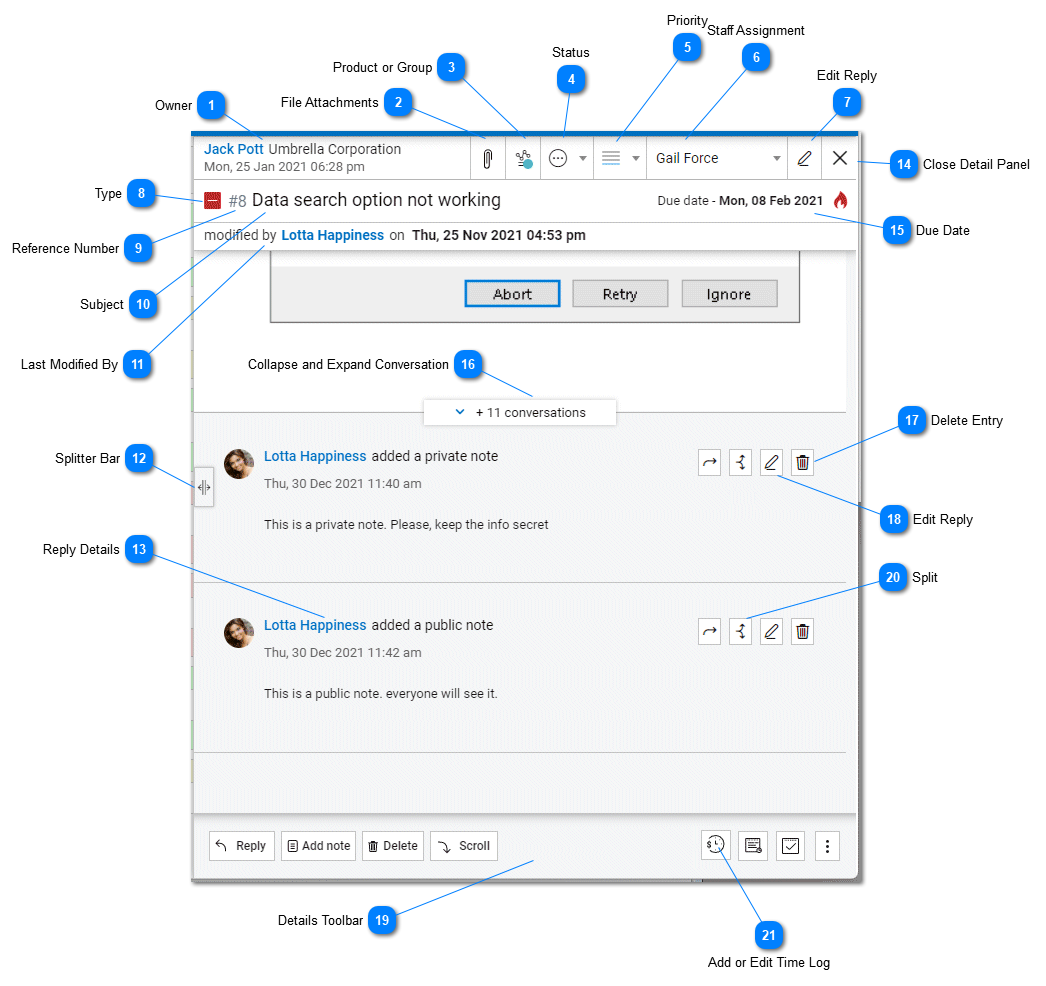
OwnerThe task owner is the originator of the task. The task owner is the entity, either an external consumer user, customer or an internal consumer user or Staff member. Depending how the tiHelpdesk instance is implemented in the subscribing organization depends on the type of task owners that the organization may have. Clicking on the contact name will open the Contact Overlay.
|
StatusThe status of the task. Tasks can have custom status values, or use standard task system status values that include: Open, Waiting on Customer, Pending, Resolved, Closed. The Status can be changed from the task header if a user has the correct privileges. Refer to the Administration help topics for setting custom task statuses. For more information please refer to the Status help topic.
|
PriorityThe priority of the task often determined or set by the task originator (depending on the configuration settings) The task can be assigned custom priorities or use standard task system priority values that include: Urgent, High, Medium, and Low. The task priority can be changed from the task header if a user has the correct privileges. For more information please refer to the Priority help topic. Please refer to the Administration help topic for setting and administering custom priorities.
|
Staff AssignmentThe staff or Agent that has been assigned to a task. The assignee can be changed from the task header if a user has the correct privileges. This is the identity of the Staff member or Agent that is responsible for resolving the task. Only Staff members and Agents can be assigned to help desk tasks. When a task is assigned, the originator and assignee will receive a notification that the task was assigned (depending on a users' notification settings. See the User Notifications help topic for more info.)
|
TypeThe type of the task is often determined or set by the task originator (depending on the configuration settings) The task type can be assigned custom types or use standard task type that include: Task, Question, Incident, Problem, Information Only . The task type can be changed by editing the task if a user has the correct privileges. For more information please refer to the Types help topic. Please refer to the Administration help topic for setting and administering custom task types.
|
Last Modified ByThe task's last modified date and last modified by entity. This entity and date is not the date of replies attached to the task in the help desk. This date and user entity reflect the last user to edit the original task and the timestamp when any changes were made to the original task in the customer service desk. Clicking on the contact name will open the Contact Overlay.
|
Details ToolbarThe Details Toolbar displays the users option while viewing a task. For more information please review the Details Toolbar help topic.
|